QEMU 的一些基础知识及QOM(Qemu Object Model)的部分相关源码阅读

总览

QEMU(quick emulator)是一款由Fabrice Bellard等人编写的免费开源的可执行硬件虚拟化的(hardware virtualization)开源托管虚拟机(VMM)。还可以为user-level的进程执行CPU仿真,进而允许了为一种架构编译的程序在另外一种架构上面运行。

qemu是一个进程启动一个虚拟机。guest关机,qemu进程就退出。为了方便可以重启guest而不用重新启动qemu,当然guest关机后再启动qemu也是可以的。

QEMU支持大端和小端的架构。 字节序转换是通过辅助函数来实现的,而不是直接访问guest的RAM。 这样就可以运行具有与host不同的字节序的目标了。

KVM

KVM(Kernel Virtual Machine)是Linux的一个内核驱动模块,让qemu之类的程序直接在host上的CPU安全地执行guest的代码。KVM现在支持x86, ARMv8, ppc, s390和MIPS的CPU。KVM内核模块使用的是Intel或者AMD的硬件虚拟化技术来执行guest的代码。它的作用主要是负责虚拟机的创建,虚拟内存的分配,虚拟CPU寄存器的读写和虚拟cpu的运行。

那么怎么让KVM执行guest上面的代码呢?

首先qemu进程打开/dev/kvm,之后调用 KVM_RUN ioctl。

假如guest需要访问hardware device register,那就挂起guest的CPU,KVM就会退出,控制权回到qemu进程。

代码如下:

1
2
3
4
5
6
7
8
9
10
open("/dev/kvm")
ioctl(KVM_CREATE_VM)
ioctl(KVM_CREATE_VCPU)
for (;;) {
ioctl(KVM_RUN)
switch (exit_reason) {
case KVM_EXIT_IO: /* ... */
case KVM_EXIT_HLT: /* ... */
}
}

在另一个博客看到一个更详细的

1
2
3
4
5
6
7
8
9
10
11
12
13
14
15
16
17
18
19
20
21
22
23
// 第一步,获取到 KVM 句柄
kvmfd = open("/dev/kvm", O_RDWR);
// 第二步,创建虚拟机,获取到虚拟机句柄。
vmfd = ioctl(kvmfd, KVM_CREATE_VM, 0);
// 第三步,为虚拟机映射内存,还有其他的 PCI,信号处理的初始化。
ioctl(kvmfd, KVM_SET_USER_MEMORY_REGION, &mem);
// 第四步,将虚拟机镜像映射到内存,相当于物理机的 boot 过程,把镜像映射到内存。
// 第五步,创建 vCPU,并为 vCPU 分配内存空间。
ioctl(kvmfd, KVM_CREATE_VCPU, vcpuid);
vcpu->kvm_run_mmap_size = ioctl(kvm->dev_fd, KVM_GET_VCPU_MMAP_SIZE, 0);
// 第五步,创建 vCPU 个数的线程并运行虚拟机。
ioctl(kvm->vcpus->vcpu_fd, KVM_RUN, 0);
// 第六步,线程进入循环,并捕获虚拟机退出原因,做相应的处理。
for (;;) {
ioctl(KVM_RUN)
switch (exit_reason) {
case KVM_EXIT_IO: /* ... */
case KVM_EXIT_HLT: /* ... */
}
}
// 这里的退出并不一定是虚拟机关机,
// 虚拟机如果遇到 I/O 操作,访问硬件设备,缺页中断等都会退出执行,
// 退出执行可以理解为将 CPU 执行上下文返回到 Qemu。

内存

guest虚拟机里面的内存,同样使用的虚拟内存,而guest所使用的物理内存,实际是对应的是启动它的那个qemu的虚拟内存的一部分。

1
2
3
4
5
6
7
8
9
10
11
12
13
14
15
16
17
18
19
20
21
22
23
24
25
                        Guest' processes
+--------------------+
Virtual addr space | |
+--------------------+
| |
\__ Page Table \__
\ \
| | Guest kernel
+----+--------------------+----------------+
Guest's phy. memory | | | |
+----+--------------------+----------------+
| |
\__ \__
\ \
| QEMU process |
+----+------------------------------------------+
Virtual addr space | | |
+----+------------------------------------------+
| |
\__ Page Table \__
\ \
| |
+----+-----------------------------------------------++
Physical memory | | ||
+----+-----------------------------------------------++

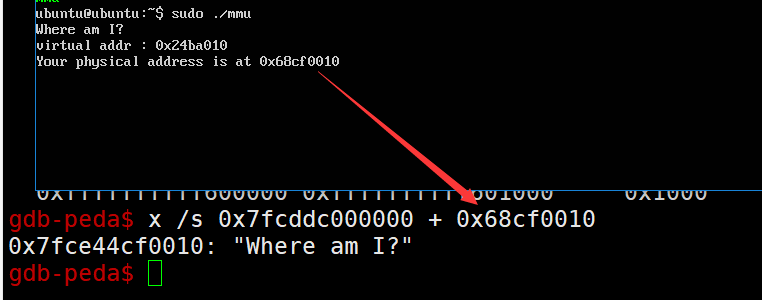
比如我们qemu启动了一个2G内存的虚拟机,我们查看内存maps,可以发现有个内存就是2G,就是guest所使用的物理内存

sudo catlink
1
2
3
4
5
6
7
8
9
10
11
12
13
14
15
55dad0b86000-55dad1124000 r-xp 00000000 08:01 665015                     /XXXXX/XXXXX/qemu-system-x86_64
55dad1323000-55dad13ed000 r--p 0059d000 08:01 665015 /XXXXX/XXXXX/qemu-system-x86_64
55dad13ed000-55dad146a000 rw-p 00667000 08:01 665015 /XXXXX/XXXXX/qemu-system-x86_64
55dad146a000-55dad18d9000 rw-p 00000000 00:00 0
55dad1f65000-55dad3b83000 rw-p 00000000 00:00 0 [heap]
7f1a1c000000-7f1a1c022000 rw-p 00000000 00:00 0
7f1a1c022000-7f1a20000000 ---p 00000000 00:00 0
7f1a20000000-7f1aa0000000 rw-p 00000000 00:00 0 //这个就是2G内存
7f1aa0000000-7f1aa07a0000 rw-p 00000000 00:00 0
7f1aa07a0000-7f1aa4000000 ---p 00000000 00:00 0
7f1aa4acb000-7f1aa8000000 rw-p 00000000 00:00 0
7f1aa8000000-7f1aa809e000 rw-p 00000000 00:00 0
......
......
......

而我们在guest里面申请的虚拟内存可以转化到host的qemu进程中的虚拟内存(相当于guest所认为物理内存)

漏洞利用的时候有些函数需要传递的是物理地址,所以需要将guest中的虚拟地址转化为物理地址。

这有两层转换:
1、从guest 的虚拟机地址 to guest 的物理地址
2、从 guest 的物理地址 to host的QEMU进程虚拟地址

对于第一层转换,通过pagemap页面映射文件来获取信息进行转换,具体可以参考下面的文档

https://www.kernel.org/doc/Documentation/vm/pagemap.txt

1
2
3
4
5
6
7
8
9
* Bits 0-54  page frame number (PFN) if present
* Bits 0-4 swap type if swapped
* Bits 5-54 swap offset if swapped
* Bit 55 pte is soft-dirty (see Documentation/vm/soft-dirty.txt)
* Bit 56 page exclusively mapped (since 4.2)
* Bits 57-60 zero
* Bit 61 page is file-page or shared-anon (since 3.5)
* Bit 62 page swapped
* Bit 63 page present

下面的代码来源于http://phrack.org/papers/vm-escape-qemu-case-study.html,而它参考的是https://github.com/nelhage/virtunoid/blob/master/virtunoid.c,我加了点注释

核心的点是:
1、虚拟地址的低12位是页内偏移,而高位是物理帧在pagemap文件中的偏移,由于一个地址占用8个字节,所以获取在pagemap文件中的偏移需要乘8
2、在pagemap读取出来的是满足上面的规则,可以通过bit 63判断页面是否存在
3、最后0-54位返回就是物理帧的地址了,再或上低12位的页内偏移,那就是完整的物理地址了

1
2
3
4
5
6
7
8
9
10
11
12
13
14
15
16
17
18
19
20
21
22
23
24
25
26
27
28
29
30
31
32
33
34
35
36
37
38
39
40
41
42
43
44
45
46
47
48
49
50
51
52
53
54
55
56
57
58
59
60
61
62
63
64
65
66
67
68
69
70
71
72
73
74
75
#include <stdio.h>
#include <string.h>
#include <stdint.h>
#include <stdlib.h>
#include <fcntl.h>
#include <assert.h>
#include <inttypes.h>

#define PAGE_SHIFT 12
#define PAGE_SIZE (1 << PAGE_SHIFT)
#define PFN_PRESENT (1ull << 63)
#define PFN_PFN ((1ull << 55) - 1)

int fd;
// 获取页内偏移
uint32_t page_offset(uint32_t addr)
{
// addr & 0xfff
return addr & ((1 << PAGE_SHIFT) - 1);
}

uint64_t gva_to_gfn(void *addr)
{
uint64_t pme, gfn;
size_t offset;

printf("pfn_item_offset : %p\n", (uintptr_t)addr >> 9);
offset = ((uintptr_t)addr >> 9) & ~7;

////下面是网上其他人的代码,只是为了理解上面的代码
//一开始除以 0x1000 (getpagesize=0x1000,4k对齐,而且本来低12位就是页内索引,需要去掉),即除以2**12, 这就获取了页号了,
//pagemap中一个地址64位,即8字节,也即sizeof(uint64_t),所以有了页号后,我们需要乘以8去找到对应的偏移从而获得对应的物理地址
//最终 vir/2^12 * 8 = (vir / 2^9) & ~7
//这跟上面的右移9正好对应,但是为什么要 & ~7 ,因为你 vir >> 12 << 3 , 跟vir >> 9 是有区别的,vir >> 12 << 3低3位肯定是0,所以通过& ~7将低3位置0
// int page_size=getpagesize();
// unsigned long vir_page_idx = vir/page_size;
// unsigned long pfn_item_offset = vir_page_idx*sizeof(uint64_t);

lseek(fd, offset, SEEK_SET);
read(fd, &pme, 8);
// 确保页面存在——page is present.
if (!(pme & PFN_PRESENT))
return -1;
// physical frame number
gfn = pme & PFN_PFN;
return gfn;
}

uint64_t gva_to_gpa(void *addr)
{
uint64_t gfn = gva_to_gfn(addr);
assert(gfn != -1);
return (gfn << PAGE_SHIFT) | page_offset((uint64_t)addr);
}

int main()
{
uint8_t *ptr;
uint64_t ptr_mem;

fd = open("/proc/self/pagemap", O_RDONLY);
if (fd < 0) {
perror("open");
exit(1);
}

ptr = malloc(256);
strcpy(ptr, "Where am I?");
printf("%s\n", ptr);
ptr_mem = gva_to_gpa(ptr);
printf("Your physical address is at 0x%"PRIx64"\n", ptr_mem);

getchar();
return 0;
}

将上面这个代码编译后,放到qemu运行(root权限)

之后我们在主机gdb attach到qemu的pid(root权限)

查看分配给qemu虚拟机对应的内存,我们分配的是2G,所以大小是0x8000000

1
2
3
4
5
6
7
8
9
10
11
12
13
14
15
16
17
18
19
20
21
gdb-peda$ info proc mappings
process 2776
Mapped address spaces:

Start Addr End Addr Size Offset objfile
0x56154915f000 0x5615497a2000 0x643000 0x0 /XXXXXXXXXX/qemu/bin/debug/native/x86_64-softmmu/qemu-system-x86_64
0x5615499a1000 0x561549a71000 0xd0000 0x642000 /XXXXXXXXXX/qemu/bin/debug/native/x86_64-softmmu/qemu-system-x86_64
0x561549a71000 0x561549af7000 0x86000 0x712000 /XXXXXXXXXX/qemu/bin/debug/native/x86_64-softmmu/qemu-system-x86_64
0x561549af7000 0x561549f87000 0x490000 0x0
0x56154b0fc000 0x56154cd14000 0x1c18000 0x0 [heap]
0x7fcdd4000000 0x7fcdd40b8000 0xb8000 0x0
0x7fcdd40b8000 0x7fcdd8000000 0x3f48000 0x0
0x7fcdd86c9000 0x7fcddbe00000 0x3737000 0x0
0x7fcddbe00000 0x7fcddbe01000 0x1000 0x0
0x7fcddbeff000 0x7fcddc000000 0x101000 0x0
0x7fcddc000000 0x7fce5c000000 0x80000000 0x0 <=========就这个
0x7fce5c000000 0x7fce5c883000 0x883000 0x0
0x7fce5c883000 0x7fce60000000 0x377d000 0x0
。。。。。。
。。。。。。
。。。。。。

确实可以在qemu的进程的虚拟地址看到我们字符串

PCI设备

PCI是一个外部链接(Peripheral Component Interconnect)标准,PCI设备就是符合这个标准的设备,且连接到PCI总线上。而PCI总线是CPU与外部设备沟通的桥梁。

每个PCI设备对应备一个PCI配置空间(PCI Configuration Space),它记录了关于此设备的信息。PCI配置空间最大256个字节,其中前64字节都是预定义好的标准。

我们可以看下面的图,我copy过来了两张,其实都是一样的,不过第一张对于Base Address Registers更加细致。

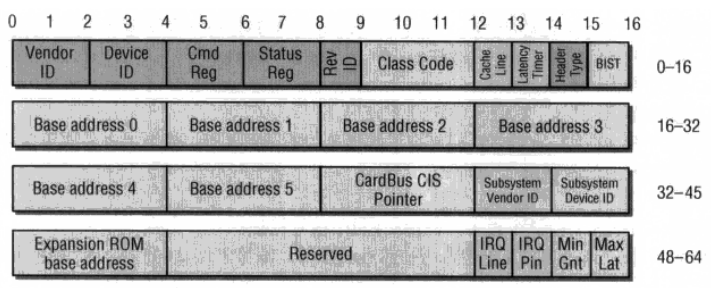
具体的数据结构如下(复制于一个文章,暂时没在qemu源码找到,不确定是否准确,仅供参考):

1
2
3
4
5
6
7
8
9
10
11
12
13
14
15
16
17
18
19
20
21
22
23
typedef struct {
WORD wBusNum; // Bus No. input field
WORD wDeviceNum; // Device No. input field
WORD wFunction; // Function No. input field
WORD wVendorId; // Vendor ID input field
WORD wDeviceId; // Device ID input field
WORD wDeviceIndex; // Device Search No. input field
WORD wCommand; // Command
WORD wClassId; // Class ID
BYTE byInterfaceId; // Interface ID
BYTE byRevId; // Revision ID
BYTE byCLS; // Cache Line Size
BYTE byLatency; // Latency Timer
DWORD dwBaseAddr[6]; // Base Address Register
DWORD dwCIS;
WORD wSubSystemVendorId;
WORD wSubSystemId;
DWORD dwRomBaseAddr; // Extension ROM Base Address
BYTE byIntLine; // Interrupt Line
BYTE byIntPin; // Interrupt Pin
BYTE byMaxLatency; // Max Latency
BYTE byMinGrant; // Min Grant
} PCIDEV, *LPPCIDEV;

前面就是一些制造商ID,设备ID,等信息.

比较重要的就是那6个Base Address Registers,简称BAR。当然不是必须要有6个BAR。每个BAR记录了该设备映射的一段地址空间,映射的地址空间有Memory 空间和 I/O 空间。

Memory 空间和 I/O 空间的区别是最低位,Memory 空间最低位是0, I/O 空间的最低位是1

若是Memory 空间,1-2位表示内存的类型(type),bit 2为1表示采用64位地址,为0表示采用32位地址。bit1为1表示区间大小超过1M,为0表示不超过1M。bit3表示是否支持可预读取(Prefetchable)。

比如下面的设备,第一个是Memory 空间,第二个是 I/O 空间,看到最后一列,0x0000000000040200的最低bit是0,而0x0000000000040101的最低bit是1(前两列是空间的其实地址,第一个Memory 空间是0xfebf1000到0xfebf10ff,而第二个I/O ports是从0xc050到0xc057共8个端口)

1
2
3
4
5
6
7
8
9
10
11
12
13
14
ubuntu@ubuntu:~$ cat /sys/devices/pci0000\:00/0000\:00\:03.0/resource
0x00000000febf1000 0x00000000febf10ff 0x0000000000040200
0x000000000000c050 0x000000000000c057 0x0000000000040101
0x0000000000000000 0x0000000000000000 0x0000000000000000

其实上面说Memory 空间和I/O 空间分别对应我们常见到的MMIO,PMIO

1
2
内存映射I/O (Memory-mapped I/O —— MMIO)
端口映射I/O (port-mapped I/O —— PMIO)

通过Memory 空间访问设备I/O的方式称为memory mapped I/O,即MMIO,这种情况下,CPU直接使用普通访存指令即可访问设备I/O。
通过I/O 空间访问设备I/O的方式称为port mapped I/O,即PMIO,这种情况下CPU需要使用专门的I/O指令如IN/OUT访问I/O端口。

MMIO,PMIO是PC机在中央处理器(CPU)和外部设备之间执行输入输出操作的两种方法,这两种方法互为补充。

查看PCI设备的信息

以BlizzardCTF 2017 Strng为例

查看当前虚拟机的pci设备

1
2
3
4
5
6
7
8
ubuntu@ubuntu:~$ lspci
00:00.0 Host bridge: Intel Corporation 440FX - 82441FX PMC [Natoma] (rev 02)
00:01.0 ISA bridge: Intel Corporation 82371SB PIIX3 ISA [Natoma/Triton II]
00:01.1 IDE interface: Intel Corporation 82371SB PIIX3 IDE [Natoma/Triton II]
00:01.3 Bridge: Intel Corporation 82371AB/EB/MB PIIX4 ACPI (rev 03)
00:02.0 VGA compatible controller: Device 1234:1111 (rev 02)
00:03.0 Unclassified device [00ff]: Device 1234:11e9 (rev 10)
00:04.0 Ethernet controller: Intel Corporation 82540EM Gigabit Ethernet Controller (rev 03)

-v可以查看更加详细信息,看到内存是0xfebf1000的256字节大小的,PMIO端口是0xc050开始的8个端口号

1
2
3
4
5
6
7
8
9
10
11
ubuntu@ubuntu:~$ lspci -v
......

00:03.0 Unclassified device [00ff]: Device 1234:11e9 (rev 10)
Subsystem: Red Hat, Inc Device 1100
Physical Slot: 3
Flags: fast devsel
Memory at febf1000 (32-bit, non-prefetchable) [size=256]
I/O ports at c050 [size=8]

......

上面设备过多可能不太友好,可用-s指定

1
2
3
4
5
6
7
ubuntu@ubuntu:~$ lspci -v  -s 00:03.0
00:03.0 Unclassified device [00ff]: Device 1234:11e9 (rev 10)
Subsystem: Red Hat, Inc Device 1100
Physical Slot: 3
Flags: fast devsel
Memory at febf1000 (32-bit, non-prefetchable) [size=256]
I/O ports at c050 [size=8]

查看header的一些具体的值

1
2
3
4
5
6
7
8
9
ubuntu@ubuntu:~$ lspci -v -m -n -s 00:03.0
Device: 00:03.0
Class: 00ff
Vendor: 1234
Device: 11e9
SVendor: 1af4
SDevice: 1100
PhySlot: 3
Rev: 10

我们在文件系统中也可以看到这个设备的文件(linux一切皆文件)

1
2
3
4
5
6
7
8
9
10
11
12
13
14
15
16
17
18
19
20
21
22
23
24
25
26
27
28
29
ubuntu@ubuntu:~$ ll /sys/devices/pci0000\:00/0000:00:03.0/
total 0
drwxr-xr-x 3 root root 0 Nov 18 03:30 ./
drwxr-xr-x 11 root root 0 Nov 18 03:30 ../
-rw-r--r-- 1 root root 4096 Nov 18 03:52 broken_parity_status
-r--r--r-- 1 root root 4096 Nov 18 03:38 class
-rw-r--r-- 1 root root 256 Nov 18 03:38 config
-r--r--r-- 1 root root 4096 Nov 18 03:52 consistent_dma_mask_bits
-rw-r--r-- 1 root root 4096 Nov 18 03:52 d3cold_allowed
-r--r--r-- 1 root root 4096 Nov 18 03:38 device
-r--r--r-- 1 root root 4096 Nov 18 03:52 dma_mask_bits
-rw-r--r-- 1 root root 4096 Nov 18 03:52 enable
lrwxrwxrwx 1 root root 0 Nov 18 03:52 firmware_node -> ../../LNXSYSTM:00/device:00/PNP0A03:00/device:06/
-r--r--r-- 1 root root 4096 Nov 18 03:31 irq
-r--r--r-- 1 root root 4096 Nov 18 03:52 local_cpulist
-r--r--r-- 1 root root 4096 Nov 18 03:52 local_cpus
-r--r--r-- 1 root root 4096 Nov 18 03:52 modalias
-rw-r--r-- 1 root root 4096 Nov 18 03:52 msi_bus
drwxr-xr-x 2 root root 0 Nov 18 03:52 power/
--w--w---- 1 root root 4096 Nov 18 03:52 remove
--w--w---- 1 root root 4096 Nov 18 03:52 rescan
-r--r--r-- 1 root root 4096 Nov 18 03:38 resource
-rw------- 1 root root 256 Nov 18 03:52 resource0
-rw------- 1 root root 8 Nov 18 03:52 resource1
lrwxrwxrwx 1 root root 0 Nov 18 03:52 subsystem -> ../../../bus/pci/
-r--r--r-- 1 root root 4096 Nov 18 03:52 subsystem_device
-r--r--r-- 1 root root 4096 Nov 18 03:52 subsystem_vendor
-rw-r--r-- 1 root root 4096 Nov 18 03:30 uevent
-r--r--r-- 1 root root 4096 Nov 18 03:38 vendor

查看设备id是device文件

1
2
ubuntu@ubuntu:~$ cat /sys/devices/pci0000\:00/0000\:00\:03.0/device
0x11e9

查看MMIO,PMIO映射可以看resource(三列分别是开始地址 结束地址 标志),第一行是MMIO,第二行是PMIO(有时候lspci -v看不到信息的时候可以通过resource文件查看)

1
2
3
4
5
6
7
8
9
10
11
12
13
14
ubuntu@ubuntu:~$ cat /sys/devices/pci0000\:00/0000:00:03.0/resource
0x00000000febf1000 0x00000000febf10ff 0x0000000000040200
0x000000000000c050 0x000000000000c057 0x0000000000040101
0x0000000000000000 0x0000000000000000 0x0000000000000000

查看ioports(有些虚拟机查看不到)

1
2
3
4
5
6
7
8
9
10
11
12
13
14
15
16
17
18
19
20
21
22
23
24
25
26
27
28
29
30
31
32
33
34
35
36
37
# cat /proc/ioports
0000-0cf7 : PCI Bus 0000:00
0000-001f : dma1
0020-0021 : pic1
0040-0043 : timer0
0050-0053 : timer1
0060-0060 : keyboard
0064-0064 : keyboard
0070-0071 : rtc0
0080-008f : dma page reg
00a0-00a1 : pic2
00c0-00df : dma2
00f0-00ff : fpu
0170-0177 : 0000:00:01.1
0170-0177 : ata_piix
01f0-01f7 : 0000:00:01.1
01f0-01f7 : ata_piix
0376-0376 : 0000:00:01.1
0376-0376 : ata_piix
03c0-03df : vga+
03f6-03f6 : 0000:00:01.1
03f6-03f6 : ata_piix
03f8-03ff : serial
0510-051b : QEMU0002:00[ 9.062032] random: fast init done

0600-063f : 0000:00:01.3
0600-0603 : ACPI PM1a_EVT_BLK
0604-0605 : ACPI PM1a_CNT_BLK
0608-060b : ACPI PM_TMR
0700-070f : 0000:00:01.3
0cf8-0cff : PCI conf1
0d00-ffff : PCI Bus 0000:00
afe0-afe3 : ACPI GPE0_BLK
c000-c03f : 0000:00:03.0
c000-c03f : e1000
c040-c04f : 0000:00:01.1
c040-c04f : ata_piix

访问PCI设备配置空间中的Memory 空间和 I/O 空间

PMIO端口的编址是独立于系统的地址空间,其实就是一段地址区域,所有外设的地址都映射到这段区域中。

MMIO是直接把寄存器的地址空间直接映射到系统地址空间,系统地址空间往往会保留一段内存区用于这种MMIO的映射(当然肯定是位于系统内存区),这样系统可以直接使用普通的访存指令直接访问设备的寄存器,随着计算机内存容量的日益增大,这种方式更是显出独特的优势,在性能至上的理念下,使用MMIO可以最大限度满足日益增长的系统和外设存储的需要。所以当前其实大多数外设都是采用MMIO的方式。

MMIO

MMIO示例代码:通过映射resource0文件实现对Memory 空间的访问

1
2
3
4
5
6
7
8
9
10
11
12
13
14
15
16
17
18
19
20
21
22
23
24
25
26
27
28
29
30
31
32
33
34
35
36
37
38
39
40
41
42
43
44
45
46
47
48
49
50
51
52
53
54
55
56
57
#include <stdio.h>
#include <unistd.h>
#include <stdlib.h>
#include <stdint.h>
#include <string.h>
#include <errno.h>
#include <signal.h>
#include <fcntl.h>
#include <ctype.h>
#include <termios.h>
#include <assert.h>
#include <sys/types.h>
#include <sys/mman.h>
#include <sys/io.h>

#define MAP_SIZE 4096UL
#define MAP_MASK (MAP_SIZE - 1)

char* pci_device_name = "/sys/devices/pci0000:00/0000:00:04.0/resource0";

unsigned char* mmio_base;

unsigned char* getMMIOBase(){

int fd;
if((fd = open(pci_device_name, O_RDWR | O_SYNC)) == -1) {
perror("open pci device");
exit(-1);
}
mmio_base = mmap(0, MAP_SIZE, PROT_READ | PROT_WRITE, MAP_SHARED, fd, 0);
if(mmio_base == (void *) -1) {
perror("mmap");
exit(-1);
}
return mmio_base;
}

void mmio_write(uint64_t addr, uint64_t value)
{
*((uint64_t*)(mmio_base + addr)) = value;
}

uint64_t mmio_read(uint64_t addr)
{
return *((uint64_t*)(mmio_base + addr));
}

int main(int argc, char const *argv[])
{
getMMIOBase();
printf("mmio_base Resource0Base: %p\n", mmio_base);

mmio_write(144, val);
mmio_read(144);

return 0;
}

据说还可以这样,但是这个在用户空间好像不行,应该是只能编写内核模块,即驱动才能用

1
2
3
4
5
6
7
8
9
10
11
12
13
14
#include <asm/io.h>
#include <linux/ioport.h>

long addr=ioremap(ioaddr,iomemsize);
readb(addr);
readw(addr);
readl(addr);
readq(addr);//qwords=8 btyes

writeb(val,addr);
writew(val,addr);
writel(val,addr);
writeq(val,addr);
iounmap(addr);

PMIO

需要权限才能访问端口,0x000-0x3ff可以用ioperm(from, num, turn_on)

比如ioperm(0x300,5,1); 获得 0x300 到 0x304 端口的访问权限

但是更高的端口就要用iopl(3)来获得权限,这个可以获得范围所有端口权限。当然我们需要root用户来运行程序才行。

in,out系列函数如下,分别是写入/读取一个字节(b结尾),两个字节(w结尾),四个字节(l结尾)

1
2
3
4
5
6
7
8
9
10
#include <sys/io.h >

iopl(3);
inb(port);
inw(port);
inl(port);

outb(val,port);
outw(val,port);
outl(val,port);

当然调试的时候可以通过dd来触发PMIO

比如用dd命令向0xc050端口写入666吧,echo会自动加上换行,所以实际写入的是666加上换行

1
2
ubuntu@ubuntu:~$ echo 666 > test
ubuntu@ubuntu:~$ sudo dd if=test of=/sys/devices/pci0000\:00/0000\:00\:03.0/resource1 bs=4 count=1

QEMU中的对象模型

QEMU提供了一套面向对象编程的模型——QOM,即QEMU Object Module,几乎所有的设备如CPU、内存、总线等都是利用这一面向对象的模型来实现的。

而对象的初始化分为四步:

  1. 将 TypeInfo 注册 TypeImpl
  2. 实例化 ObjectClass
  3. 实例化 Object
  4. 添加 Property

QOM模型的实现代码位于qom/文件夹下的文件中,这涉及了几个结构TypeImpl, ObjectClass, Object和TypeInfo。看了下它们的定义都在https://github.com/qemu/qemu/blob/master/include/qom/object.h可以找到,只有TypeImpl的具体结构是在https://github.com/qemu/qemu/blob/master/qom/object.c中。

ObjectClass: 是所有类对象的基类,仅仅保存了一个整数 type 。
Object: 是所有对象的 基类Base Object , 第一个成员变量为指向 ObjectClass 的指针。
TypeInfo:是用户用来定义一个 Type 的工具型的数据结构。
TypeImpl:对数据类型的抽象数据结构,TypeInfo的属性与TypeImpl的属性对应。

将 TypeInfo 注册 TypeImpl

下面是TypeInfo

1
2
3
4
5
6
7
8
9
10
11
12
13
14
15
16
17
18
19
struct TypeInfo
{
const char *name;
const char *parent;

size_t instance_size;
void (*instance_init)(Object *obj);
void (*instance_post_init)(Object *obj);
void (*instance_finalize)(Object *obj);

bool abstract;
size_t class_size;

void (*class_init)(ObjectClass *klass, void *data);
void (*class_base_init)(ObjectClass *klass, void *data);
void *class_data;

InterfaceInfo *interfaces;
};

2018年12月更新,删除了class_finalize函数

https://github.com/qemu/qemu/commit/37fdb2c56c603378b85466d1dd64fb4c95f9deb7

注释对于里面的成员写得比较详细了

1
2
3
4
5
6
7
8
9
10
11
12
13
14
15
16
17
18
19
20
21
22
23
24
25
26
27
28
29
30
31
32
33
34
35
36
37
38
/**
* TypeInfo:
* @name: The name of the type.
* @parent: The name of the parent type.
* @instance_size: The size of the object (derivative of #Object). If
* @instance_size is 0, then the size of the object will be the size of the
* parent object.
* @instance_init: This function is called to initialize an object. The parent
* class will have already been initialized so the type is only responsible
* for initializing its own members.
* @instance_post_init: This function is called to finish initialization of
* an object, after all @instance_init functions were called.
* @instance_finalize: This function is called during object destruction. This
* is called before the parent @instance_finalize function has been called.
* An object should only free the members that are unique to its type in this
* function.
* @abstract: If this field is true, then the class is considered abstract and
* cannot be directly instantiated.
* @class_size: The size of the class object (derivative of #ObjectClass)
* for this object. If @class_size is 0, then the size of the class will be
* assumed to be the size of the parent class. This allows a type to avoid
* implementing an explicit class type if they are not adding additional
* virtual functions.
* @class_init: This function is called after all parent class initialization
* has occurred to allow a class to set its default virtual method pointers.
* This is also the function to use to override virtual methods from a parent
* class.
* @class_base_init: This function is called for all base classes after all
* parent class initialization has occurred, but before the class itself
* is initialized. This is the function to use to undo the effects of
* memcpy from the parent class to the descendants.
* @class_data: Data to pass to the @class_init,
* @class_base_init. This can be useful when building dynamic
* classes.
* @interfaces: The list of interfaces associated with this type. This
* should point to a static array that's terminated with a zero filled
* element.
*/

其实包含了下面信息

  1. Name
    包括自己的Name,Parent的Name。
  2. Class(针对ObjectClass)
    ObjectClass的信息包括,class_size,class_data,class相关函数:class_base_init,class_init,class_finalize。
    这些函数都是为了初始化,释放结构体ObjectClass。
  3. Instance(针对的是Object)
    对象Object信息包括:instance_size,instance相关函数:instance_post_init,instance_init,instance_finalize。
    这些函数都是为了初始化,释放结构体Object。
  4. 其他信息
    abstract是否为抽象。interface数组。

一般是定义一个TypeInfo,然后调用 type_register(TypeInfo) 或者 type_register_static(TypeInfo) 函数(我看到的基本都是type_register_static比较多),就会生成相应的TypeImpl实例,将这个TypeInfo注册到全局的TypeImpl的hash表中。
TypeInfo的属性与TypeImpl的属性对应,实际上qemu就是通过用户提供的TypeInfo创建的TypeImpl的对象。

我们看看https://github.com/qemu/qemu/blob/master/include/qom/object.h里面的注释,看看怎么定义一个TypeInfo,

1
2
3
4
5
6
7
8
9
10
11
12
13
14
15
16
17
18
19
20
21
22
23
24
25
26
27
28
29
30
31
* <example>
* <title>Creating a minimal type</title>
* <programlisting>
* #include "qdev.h"
*
* #define TYPE_MY_DEVICE "my-device"
*
* // No new virtual functions: we can reuse the typedef for the
* // superclass.
* typedef DeviceClass MyDeviceClass;
* typedef struct MyDevice
* {
* DeviceState parent;
*
* int reg0, reg1, reg2;
* } MyDevice;
*
* static const TypeInfo my_device_info = {
* .name = TYPE_MY_DEVICE,
* .parent = TYPE_DEVICE,
* .instance_size = sizeof(MyDevice),
* };
*
* static void my_device_register_types(void)
* {
* type_register_static(&my_device_info);
* }
*
* type_init(my_device_register_types)
* </programlisting>
* </example>

或者我们去源码找一个实际的硬件https://github.com/qemu/qemu/blob/1c5880e785807abcc715a7ee216706e02c1af689/hw/pci/pci.c#L2801

1
2
3
4
5
6
7
8
9
10
11
12
13
14
15
16
17
18
19
20
static const TypeInfo pci_device_type_info = {
.name = TYPE_PCI_DEVICE,
.parent = TYPE_DEVICE,
.instance_size = sizeof(PCIDevice),
.abstract = true,
.class_size = sizeof(PCIDeviceClass),
.class_init = pci_device_class_init,
.class_base_init = pci_device_class_base_init,
};

static void pci_register_types(void)
{
type_register_static(&pci_bus_info);
type_register_static(&pcie_bus_info);
type_register_static(&conventional_pci_interface_info);
type_register_static(&pcie_interface_info);
type_register_static(&pci_device_type_info);
}

type_init(pci_register_types)

可以看到定义的时候不一定要初始化所有的成员,

type_init接收用户写好的XXX_register_types(里面使用type_register_static生成相应的TypeImpl实例)

跟随type_register_static函数去看看

1
2
3
4
5
6
7
8
9
10
11
12
13
14
15
16
17
18
19
static TypeImpl *type_register_internal(const TypeInfo *info)
{
TypeImpl *ti;
ti = type_new(info);

type_table_add(ti);
return ti;
}

TypeImpl *type_register(const TypeInfo *info)
{
assert(info->parent);
return type_register_internal(info);
}

TypeImpl *type_register_static(const TypeInfo *info)
{
return type_register(info);
}

可以看到最终进入type_register_internaltype_new就是将TypeInfo的信息传递给TypeImpl

1
2
3
4
5
6
7
8
9
10
11
12
13
14
15
16
17
18
19
20
21
22
23
24
25
26
27
28
29
30
31
32
33
34
35
static TypeImpl *type_new(const TypeInfo *info)
{
TypeImpl *ti = g_malloc0(sizeof(*ti));
int i;

g_assert(info->name != NULL);

if (type_table_lookup(info->name) != NULL) {
fprintf(stderr, "Registering `%s' which already exists\n", info->name);
abort();
}

ti->name = g_strdup(info->name);
ti->parent = g_strdup(info->parent);

ti->class_size = info->class_size;
ti->instance_size = info->instance_size;

ti->class_init = info->class_init;
ti->class_base_init = info->class_base_init;
ti->class_data = info->class_data;

ti->instance_init = info->instance_init;
ti->instance_post_init = info->instance_post_init;
ti->instance_finalize = info->instance_finalize;

ti->abstract = info->abstract;

for (i = 0; info->interfaces && info->interfaces[i].type; i++) {
ti->interfaces[i].typename = g_strdup(info->interfaces[i].type);
}
ti->num_interfaces = i;

return ti;
}

之后的type_table_add就是将TypeImpl插入到一个哈希表

1
2
3
4
5
6
7
8
9
10
11
12
13
14
15
16
17
18
static GHashTable *type_table_get(void)
{
static GHashTable *type_table;

if (type_table == NULL) {
type_table = g_hash_table_new(g_str_hash, g_str_equal);
}

return type_table;
}

static bool enumerating_types;

static void type_table_add(TypeImpl *ti)
{
assert(!enumerating_types);
g_hash_table_insert(type_table_get(), (void *)ti->name, ti);
}

上面的g_hash_table_insert是glib库中的函数,定义如下:

1
2
3
4
gboolean
g_hash_table_insert (GHashTable *hash_table,
gpointer key,
gpointer value);

首先第一个参数通过type_table_get()中的g_hash_table_new创建一个GHashTable,第二、三个参数就是key和value了,这里分别是name还有TypeImpl。

有了一个TypeImpl的哈希表,下一步就是初始化每个type了,这一步可以看成是class的初始化,可以理解成每一个type对应了一个class,接下来会初始化class。

我们回到type_init,这实际是个宏,代码在https://github.com/qemu/qemu/blob/bb9bf94b3e8926553290bc9a7cb84315af422086/include/qemu/module.h#L21,看着跟linux的驱动有点像的感觉,当肯定不是一回事,可以看到do_qemu_init_ ## function(void)前面有__attribute__((constructor))关键字,这个可以让函数在main函数之前执行!!!。

1
2
3
4
5
6
7
8
9
10
11
12
13
14
15
16
17
18
19
20
21
22
23
24
25
26
27
28
29
30
31
32
33
#ifdef BUILD_DSO
void DSO_STAMP_FUN(void);
/* This is a dummy symbol to identify a loaded DSO as a QEMU module, so we can
* distinguish "version mismatch" from "not a QEMU module", when the stamp
* check fails during module loading */
void qemu_module_dummy(void);

#define module_init(function, type) \
static void __attribute__((constructor)) do_qemu_init_ ## function(void) \
{ \
register_dso_module_init(function, type); \
}
#else
/* This should not be used directly. Use block_init etc. instead. */
#define module_init(function, type) \
static void __attribute__((constructor)) do_qemu_init_ ## function(void) \
{ \
register_module_init(function, type); \
}
#endif

typedef enum {
MODULE_INIT_BLOCK,
MODULE_INIT_OPTS,
MODULE_INIT_QOM,
MODULE_INIT_TRACE,
MODULE_INIT_MAX
} module_init_type;

#define block_init(function) module_init(function, MODULE_INIT_BLOCK)
#define opts_init(function) module_init(function, MODULE_INIT_OPTS)
#define type_init(function) module_init(function, MODULE_INIT_QOM)
#define trace_init(function) module_init(function, MODULE_INIT_TRACE)

可以看到是调用的register_module_inithttps://github.com/qemu/qemu/blob/810923480863c43ecb22ae124156298385439339/util/module.c#L62

1
2
3
4
5
6
7
8
9
10
11
12
13
14
15
16
17
18
19
20
21
22
23
24
25
26
27
28
29
30
31
32
33
34
35
36
37
38
39
40
41
42
43
44
static ModuleTypeList init_type_list[MODULE_INIT_MAX];

static ModuleTypeList dso_init_list;

static void init_lists(void)
{
static int inited;
int i;

if (inited) {
return;
}

for (i = 0; i < MODULE_INIT_MAX; i++) {
QTAILQ_INIT(&init_type_list[i]);
}

QTAILQ_INIT(&dso_init_list);

inited = 1;
}
......
......
......
static ModuleTypeList *find_type(module_init_type type)
{
init_lists();

return &init_type_list[type];
}

void register_module_init(void (*fn)(void), module_init_type type)
{
ModuleEntry *e;
ModuleTypeList *l;

e = g_malloc0(sizeof(*e));
e->init = fn;
e->type = type;

l = find_type(type);

QTAILQ_INSERT_TAIL(l, e, node);
}

可以看到将函数指针fn给到了ModuleEntry->init,之后通过find_type(MODULE_INIT_QOM)找到对应的list,最后insert到MODULE_INIT_QOM对应的list——QTAILQ_INSERT_TAIL(l, e, node);

1
2
3
4
5
6
#define QTAILQ_INSERT_TAIL(head, elm, field) do {                       \
(elm)->field.tqe_next = NULL; \
(elm)->field.tqe_circ.tql_prev = (head)->tqh_circ.tql_prev; \
(head)->tqh_circ.tql_prev->tql_next = (elm); \
(head)->tqh_circ.tql_prev = &(elm)->field.tqe_circ; \
} while (/*CONSTCOND*/0)

那么这个东西是怎么调用的呢?(经过一顿操作,我发现qemu-system的main函数代码在vl.c文件,通过qemu-system-x86_64的main函数的特征去grep源码)

看到main函数https://github.com/qemu/qemu/blob/aceeaa69d28e6f08a24395d0aa6915b687d0a681/vl.c#L2753

1
2
3
4
5
6
7
8
9
10
11
12
13
14
15
16
17
18
19
20
21
22
23
24
25
26
27
28
29
int main(int argc, char **argv, char **envp)
{
......
......

os_set_line_buffering();

error_init(argv[0]);
module_call_init(MODULE_INIT_TRACE);

qemu_init_cpu_list();
qemu_init_cpu_loop();

qemu_mutex_lock_iothread();

atexit(qemu_run_exit_notifiers);
qemu_init_exec_dir(argv[0]);

module_call_init(MODULE_INIT_QOM); <================================ 这里

qemu_add_opts(&qemu_drive_opts);
qemu_add_drive_opts(&qemu_legacy_drive_opts);
qemu_add_drive_opts(&qemu_common_drive_opts);
qemu_add_drive_opts(&qemu_drive_opts);
qemu_add_drive_opts(&bdrv_runtime_opts);
qemu_add_opts(&qemu_chardev_opts);
qemu_add_opts(&qemu_device_opts);
qemu_add_opts(&qemu_netdev_opts);
qemu_add_opts(&qemu_nic_opts);

看打上面,在main函数中调用了module_call_init(MODULE_INIT_QOM);

再去看看module_call_init的实现,这时候就很明了了,调用的ModuleEntry中的init函数,正好和之前的register_module_init将fn函数指针复制到init函数指针的操作连起来了

1
2
3
4
5
6
7
8
9
10
11
12
// https://github.com/qemu/qemu/blob/810923480863c43ecb22ae124156298385439339/util/module.c#L89
void module_call_init(module_init_type type)
{
ModuleTypeList *l;
ModuleEntry *e;

l = find_type(type);

QTAILQ_FOREACH(e, l, node) {
e->init();
}
}

总结一下:
1、首先__attribute__((constructor))的修饰让type_init在main之前执行,type_init的参数是XXX_register_types函数指针,将函数指针传递到ModuleEntry的init函数指针,最后就是将这个ModuleEntry插入到ModuleTypeList
2、main函数中的module_call_init(MODULE_INIT_QOM);调用了MODULE_INIT_QOM类型的ModuleTypeList中的所有ModuleEntry中的init()函数,也就是第一步type_init的第一个参数XXX_register_types函数指针
3、那就下了就是XXX_register_types函数的操作了,就是创建TypeImpl的哈希表

ObjectClass的初始化

main函数中的module_call_init调用了MODULE_INIT_QOM list中的ModuleEntry的init函数,init函数进行初始化(init函数就是上面说的XXX_register_types函数),创建TypeImpl的哈希表。

main函数继续往下走我们看到调用了下面的https://github.com/qemu/qemu/blob/dd5b0f95490883cd8bc7d070db8de70d5c979cbc/vl.c#L3804

1
machine_class = select_machine();

直接给出调用链,详细代码就不贴出来了,有兴趣可以自己找找

1
main->select_machine->object_class_get_list->object_class_foreach

看到object_class_foreach函数,调用参数贴上:object_class_foreach(object_class_get_list_tramp, implements_type, include_abstract, &list);

1
2
3
4
5
6
7
8
9
10
void object_class_foreach(void (*fn)(ObjectClass *klass, void *opaque),
const char *implements_type, bool include_abstract,
void *opaque)
{
OCFData data = { fn, implements_type, include_abstract, opaque };

enumerating_types = true;
g_hash_table_foreach(type_table_get(), object_class_foreach_tramp, &data);
enumerating_types = false;
}

g_hash_table_foreach的第一个参数是函数指针——type_table_get函数,看了下应该是之前创建的name为key,TypeImpl为value的GHashTable。

上面的g_hash_table_foreach是对GHashTable中执行 GHFunc函数,也即执行object_class_foreach_tramp函数,它的参数除了key,value对,还有gpointer user_data

1
2
3
4
void
g_hash_table_foreach (GHashTable *hash_table,
GHFunc func,
gpointer user_data);

object_class_foreach_tramp这里,这里已经出现了ObjectClass,通过调用type_initialize后,即可获得ObjectClass *k

1
2
3
4
5
6
7
8
9
10
11
12
13
14
15
16
17
18
19
20
21
static void object_class_foreach_tramp(gpointer key, gpointer value,
gpointer opaque)
{
OCFData *data = opaque;
TypeImpl *type = value;
ObjectClass *k;

type_initialize(type);
k = type->class;

if (!data->include_abstract && type->abstract) {
return;
}

if (data->implements_type &&
!object_class_dynamic_cast(k, data->implements_type)) {
return;
}

data->fn(k, data->opaque);
}

最后调用的data->fn(k, data->opaque);data->fn函数其实是object_class_get_list_tramp函数,g_slist_prepend是glib库的函数(非glibc库),g_slist_prepend(*list, klass);是将klass插入到*list的开头的地方,即将ObjectClass *k插入到data->opaque列表里面,data->opaque也即在object_class_get_list函数定义的局部变量GSList *list = NULL;列表

1
2
3
4
5
6
static void object_class_get_list_tramp(ObjectClass *klass, void *opaque)
{
GSList **list = opaque;

*list = g_slist_prepend(*list, klass);
}

我们进入到type_initialize函数看看,可以看到传入的正是TypeImpl

1
2
3
4
5
6
7
8
9
10
11
12
13
14
15
16
17
18
19
20
21
22
23
24
25
26
27
28
29
30
31
32
33
34
35
36
37
38
39
40
41
42
43
44
45
46
47
48
49
50
51
52
53
54
55
56
57
58
59
60
61
62
63
64
65
66
67
68
69
70
71
72
73
74
75
76
77
78
79
80
81
82
83
84
85
86
87
static void type_initialize(TypeImpl *ti)
{
TypeImpl *parent;
// 假如ti->class不为空说明class已经初始化过了,直接返回
if (ti->class) {
return;
}

ti->class_size = type_class_get_size(ti);
ti->instance_size = type_object_get_size(ti);
/* Any type with zero instance_size is implicitly abstract.
* This means interface types are all abstract.
* instance_size为0说明这个TypeImpl是抽象的
*/
if (ti->instance_size == 0) {
ti->abstract = true;
}
// 判断ti的祖先是否是type_interface(就是不断取ti的parent去判断是否跟type_interface相等)
if (type_is_ancestor(ti, type_interface)) {
// assert(false)才会报错退出
assert(ti->instance_size == 0);
assert(ti->abstract);
assert(!ti->instance_init);
assert(!ti->instance_post_init);
assert(!ti->instance_finalize);
assert(!ti->num_interfaces);
}
// 申请class_size大小的内存给到(ti->class就是ObjectClass类型的)
ti->class = g_malloc0(ti->class_size);
// 尝试获取parent,若不为空,就会递归调用type_initialize去尝试初始化,那这里就说明为啥开头要判断ti->class是否为空
parent = type_get_parent(ti);
if (parent) {
type_initialize(parent);
GSList *e;
int i;
// ti的class_size得大于parent的class_size,将parent->class复制到ti->class
g_assert(parent->class_size <= ti->class_size);
memcpy(ti->class, parent->class, parent->class_size);
ti->class->interfaces = NULL;
ti->class->properties = g_hash_table_new_full(
g_str_hash, g_str_equal, g_free, object_property_free);

for (e = parent->class->interfaces; e; e = e->next) {
InterfaceClass *iface = e->data;
ObjectClass *klass = OBJECT_CLASS(iface);
// 初始化 ti->class->interfaces,这里是循环将父type的interface的一些信息添加到ti->class->interfaces列表上面去
type_initialize_interface(ti, iface->interface_type, klass->type);
}

for (i = 0; i < ti->num_interfaces; i++) {
//上面是ti->class->interfaces,这里ti->interfaces,很容易搞混哦
// 这里通过typename获取TypeImpl
TypeImpl *t = type_get_by_name(ti->interfaces[i].typename);
for (e = ti->class->interfaces; e; e = e->next) {
TypeImpl *target_type = OBJECT_CLASS(e->data)->type;
// 判断target_type的祖先否是是t,是的话就退出第一层for循环了
if (type_is_ancestor(target_type, t)) {
break;
}
}

if (e) {
continue;
}
// 将t的信息同样添加到ti->class->interfaces列表上面去
type_initialize_interface(ti, t, t);
}
} else {
// parent是空就初始化ti->class->properties
ti->class->properties = g_hash_table_new_full(
g_str_hash, g_str_equal, g_free, object_property_free);
}

ti->class->type = ti;

//循环调用parent的class_base_init进行初始化
while (parent) {
if (parent->class_base_init) {
parent->class_base_init(ti->class, ti->class_data);
}
parent = type_get_parent(parent);
}
//ti->class_init函数指针函数不为空,调用ti->class_init进行初始化
if (ti->class_init) {
ti->class_init(ti->class, ti->class_data);
}
}

我就将一些说明直接写在源码里头,简要概括就是,将parent->class->interfaces的一些信息添加到ti->class->interfaces列表上面,ti->interfaces[i].typename对应的type的信息也添加到ti->class->interfaces列表,最后最重要的就是调用parent的class_base_init进行初始化,最后调用自己ti->class_init进行初始化。

参考文章https://terenceli.github.io/%E6%8A%80%E6%9C%AF/2017/01/08/qom-introduction以vmxnet3为例给出了class的层次结构

可以看到如下层次关系:VMXNET3Class->PCIDeviceClass->DeviceClass->ObjectClass,这是Class的集成关系

1
2
3
4
5
6
7
8
9
10
11
12
13
14
15
16
17
18
19
20
21
22
23
24
25
26
27
28
29
30
31
32
33
34
35
36
37
38
39
40
41
42
43
44
45
46
47
48
static const TypeInfo vmxnet3_info = {
.name = TYPE_VMXNET3,
.parent = TYPE_PCI_DEVICE,
.class_size = sizeof(VMXNET3Class),
.instance_size = sizeof(VMXNET3State),
.class_init = vmxnet3_class_init,
.instance_init = vmxnet3_instance_init,
};

typedef struct VMXNET3Class {
PCIDeviceClass parent_class;
DeviceRealize parent_dc_realize;
} VMXNET3Class;

typedef struct PCIDeviceClass {
DeviceClass parent_class;

void (*realize)(PCIDevice *dev, Error **errp);
int (*init)(PCIDevice *dev);/* TODO convert to realize() and remove */
PCIUnregisterFunc *exit;
PCIConfigReadFunc *config_read;
PCIConfigWriteFunc *config_write;

...
} PCIDeviceClass;


typedef struct DeviceClass {
/*< private >*/
ObjectClass parent_class;
/*< public >*/
...
} DeviceClass;


struct ObjectClass
{
/*< private >*/
Type type;
GSList *interfaces;

const char *object_cast_cache[OBJECT_CLASS_CAST_CACHE];
const char *class_cast_cache[OBJECT_CLASS_CAST_CACHE];

ObjectUnparent *unparent;

GHashTable *properties;
};

对象的构造——实例化 Instance(Object)

https://github.com/qemu/qemu/blob/dd5b0f95490883cd8bc7d070db8de70d5c979cbc/vl.c#L4304
接下来main函数调用了qemu_opts_foreach,循环查找参数(options)

1
2
qemu_opts_foreach(qemu_find_opts("device"),
device_init_func, NULL, &error_fatal);

先看qemu_opts_foreach函数的定义,就是对于@list的每个成员——member,调用@func(@opaque, member, @errp)

1
2
int qemu_opts_foreach(QemuOptsList *list, qemu_opts_loopfunc func,
void *opaque, Error **errp)

当然之前还调用上面的之前是调用了下面两个,看了下default_driver_check就是将qemu_opt_get(opts, "driver")获取到的driver与default_list[i].driver中的比较,相等就将*(default_list[i].flag) = 0;default_list可以看这:https://github.com/qemu/qemu/blob/dd5b0f95490883cd8bc7d070db8de70d5c979cbc/vl.c#L220:3
而第二个device_help_func实际里面调用了qdev_device_help(opts);,简单看了下qdev_device_help,首先调用driver = qemu_opt_get(opts, "driver");,接下来就是输出那个driver的help信息,还有那些option什么的:https://github.com/qemu/qemu/blob/dd5b0f95490883cd8bc7d070db8de70d5c979cbc/qdev-monitor.c#L253:5

1
2
3
4
qemu_opts_foreach(qemu_find_opts("device"),
default_driver_check, NULL, NULL);
qemu_opts_foreach(qemu_find_opts("device"),
device_help_func, NULL, NULL)

扯远了,还是回到device_init_func,里面调用qdev_device_add

1
2
3
4
5
6
7
8
9
10
11
12
13
static int device_init_func(void *opaque, QemuOpts *opts, Error **errp)
{
DeviceState *dev;

dev = qdev_device_add(opts, errp);
if (!dev && *errp) {
error_report_err(*errp);
return -1;
} else if (dev) {
object_unref(OBJECT(dev));
}
return 0;
}

而在qdev_device_add里面,重要的一行是调用了dev = DEVICE(object_new(driver));,而且上一行有个注释——/* create device */

1
2
3
4
5
6
7
8
9
10
11
12
13
14
15
16
17
18
19
20
21
22
23
24
25
26
27
28
29
30
31
32
33
34
35
36
37
38
39
40
41
42
43
44
45
46
47
48
49
50
51
52
53
54
55
56
57
58
59
60
61
62
63
64
65
66
67
68
69
70
71
72
73
74
75
76
77
78
79
80
81
82
83
84
85
86
87
88
89
90
91
92
93
94
95
96
97
98
99
100
DeviceState *qdev_device_add(QemuOpts *opts, Error **errp)
{
DeviceClass *dc;
const char *driver, *path;
DeviceState *dev = NULL;
BusState *bus = NULL;
Error *err = NULL;
bool hide;
// 获取-driver的参数值
driver = qemu_opt_get(opts, "driver");
if (!driver) {
error_setg(errp, QERR_MISSING_PARAMETER, "driver");
return NULL;
}

/* find driver */
dc = qdev_get_device_class(&driver, errp);
if (!dc) {
return NULL;
}

/* find bus 找总线*/
path = qemu_opt_get(opts, "bus");
if (path != NULL) {
bus = qbus_find(path, errp);
if (!bus) {
return NULL;
}
// 看看OBJECT(bus)及其parent是否有typename为dc->bus_type
if (!object_dynamic_cast(OBJECT(bus), dc->bus_type)) {
error_setg(errp, "Device '%s' can't go on %s bus",
driver, object_get_typename(OBJECT(bus)));
return NULL;
}
} else if (dc->bus_type != NULL) {
bus = qbus_find_recursive(sysbus_get_default(), NULL, dc->bus_type);
if (!bus || qbus_is_full(bus)) {
error_setg(errp, "No '%s' bus found for device '%s'",
dc->bus_type, driver);
return NULL;
}
}
hide = should_hide_device(opts);

if ((hide || qdev_hotplug) && bus && !qbus_is_hotpluggable(bus)) {
error_setg(errp, QERR_BUS_NO_HOTPLUG, bus->name);
return NULL;
}

if (hide) {
return NULL;
}

if (!migration_is_idle()) {
error_setg(errp, "device_add not allowed while migrating");
return NULL;
}

/* create device */
dev = DEVICE(object_new(driver));

/* Check whether the hotplug is allowed by the machine 检查机器是否允许热插拔*/
if (qdev_hotplug && !qdev_hotplug_allowed(dev, &err)) {
/* Error must be set in the machine hook */
assert(err);
goto err_del_dev;
}

if (bus) {
qdev_set_parent_bus(dev, bus);
} else if (qdev_hotplug && !qdev_get_machine_hotplug_handler(dev)) {
/* No bus, no machine hotplug handler --> device is not hotpluggable */
error_setg(&err, "Device '%s' can not be hotplugged on this machine",
driver);
goto err_del_dev;
}

qdev_set_id(dev, qemu_opts_id(opts));

/* set properties */
if (qemu_opt_foreach(opts, set_property, dev, &err)) {
goto err_del_dev;
}

dev->opts = opts;
object_property_set_bool(OBJECT(dev), true, "realized", &err);
if (err != NULL) {
dev->opts = NULL;
goto err_del_dev;
}
return dev;

err_del_dev:
error_propagate(errp, err);
if (dev) {
object_unparent(OBJECT(dev));
object_unref(OBJECT(dev));
}
return NULL;
}

DEVICE是一个宏,实际是OBJECT_CHECK,而OBJECT_CHECK是A type safe version of @object_dynamic_cast_assert.,看了下object_dynamic_cast_assert的代码,主要是是看看obj是否是TYPE_DEVICE的一个实例(an instance of TYPE_DEVICE)

1
2
3
4
5
6
7
8
9
10
11
12
13
14
15
16
17
18
#define DEVICE(obj) OBJECT_CHECK(DeviceState, (obj), TYPE_DEVICE)

/**
* OBJECT_CHECK:
* @type: The C type to use for the return value.
* @obj: A derivative of @type to cast.
* @name: The QOM typename of @type
*
* A type safe version of @object_dynamic_cast_assert. Typically each class
* will define a macro based on this type to perform type safe dynamic_casts to
* this object type.
*
* If an invalid object is passed to this function, a run time assert will be
* generated.
*/
#define OBJECT_CHECK(type, obj, name) \
((type *)object_dynamic_cast_assert(OBJECT(obj), (name), \
__FILE__, __LINE__, __func__))

扯远了,重点是在object_new啊,

1
2
3
4
5
6
7
Object *object_new(const char *typename)
{
//在HashTable中查找name为typename的TypeImpl(这个HashTable是name跟TypeImpl一一对应的表)
TypeImpl *ti = type_get_by_name(typename);

return object_new_with_type(ti);
}

向下继续看object_new_with_type,首先type_initialize之前说过,主要是调用parent的class_base_init进行初始化,最后调用自己class_init进行初始化

object_initialize_with_type的话,不知为何又一次调用type_initialize,接下来就是一些判断,对obj的class和properties成员进行初始化,而object_ref看了下是对&obj->ref进行+1,主要还是看下object_init_with_typeobject_init_with_type函数吧

1
2
3
4
5
6
7
8
9
10
11
12
13
14
15
16
17
18
19
20
21
22
23
24
25
26
27
28
29
30
31
32
33
static Object *object_new_with_type(Type type)
{
Object *obj;

g_assert(type != NULL);
type_initialize(type);
// 申请内存
obj = g_malloc(type->instance_size);
object_initialize_with_type(obj, type->instance_size, type);
// 设置free函数指针,使用g_free函数
obj->free = g_free;

return obj;
}

static void object_initialize_with_type(void *data, size_t size, TypeImpl *type)
{
Object *obj = data;

type_initialize(type);

g_assert(type->instance_size >= sizeof(Object));
g_assert(type->abstract == false);
g_assert(size >= type->instance_size);

memset(obj, 0, type->instance_size);
obj->class = type->class;
object_ref(obj);
obj->properties = g_hash_table_new_full(g_str_hash, g_str_equal,
NULL, object_property_free);
object_init_with_type(obj, type);
object_post_init_with_type(obj, type);
}

object_init_with_type函数首先判断ti是否有parent(即type->parent != NULL),有parent就会递归调用object_init_with_type,最终就是调用ti->instance_init函数

object_post_init_with_type差不多,只不过先调用自身的ti->instance_post_init,再递归调用parent的ti->instance_post_init

而这些函数都是在type_init(XXXX_register_types)中的XXXX_register_types设置好的。

1
2
3
4
5
6
7
8
9
10
11
12
13
14
15
16
17
18
19
20
21
static void object_init_with_type(Object *obj, TypeImpl *ti)
{
if (type_has_parent(ti)) {
object_init_with_type(obj, type_get_parent(ti));
}

if (ti->instance_init) {
ti->instance_init(obj);
}
}

static void object_post_init_with_type(Object *obj, TypeImpl *ti)
{
if (ti->instance_post_init) {
ti->instance_post_init(obj);
}

if (type_has_parent(ti)) {
object_post_init_with_type(obj, type_get_parent(ti));
}
}

上一小节我们看到了Class的继承关系,这次是Object的继承关系,上次直接复制了参考文章作者vmxnet3的例子,虽然这个他也是用这个例子,但这次Object的继承关系我自己换一个吧,我用e1000网卡为例,看看Object的集成关系

1
2
3
4
5
6
7
8
9
10
11
12
13
14
15
16
17
18
19
20
21
22
23
24
25
26
27
28
29
30
31
32
33
34
35
36
37
38
39
40
41
42
43
44
typedef struct E1000State_st {
/*< private >*/
PCIDevice parent_obj;
/*< public >*/
......
......
} E1000State;

struct PCIDevice {
DeviceState qdev;
bool partially_hotplugged;
......
......
};

struct DeviceState {
/*< private >*/
Object parent_obj;
/*< public >*/
......
......
};

/**
* Object:
*
* The base for all objects. The first member of this object is a pointer to
* a #ObjectClass. Since C guarantees that the first member of a structure
* always begins at byte 0 of that structure, as long as any sub-object places
* its parent as the first member, we can cast directly to a #Object.
*
* As a result, #Object contains a reference to the objects type as its
* first member. This allows identification of the real type of the object at
* run time.
*/
struct Object
{
/*< private >*/
ObjectClass *class;
ObjectFree *free;
GHashTable *properties;
uint32_t ref;
Object *parent;
};

整个集成关系是

1
E1000State->PCIDevice->DeviceState->Object

MMIO,PMIO的Memory Region是在哪设置的呢

Memory Region的设置一般是在XXX_realize函数里面。比如全志科技Allwinner的一个网卡就直接卸载XXX_inti函数里面了,源码路径/hw/net/allwinner_emac.c

1
2
3
4
5
6
7
8
9
10
11
12
13
14
15
16
17
18
static void aw_emac_init(Object *obj)
{
SysBusDevice *sbd = SYS_BUS_DEVICE(obj);
AwEmacState *s = AW_EMAC(obj);

memory_region_init_io(&s->iomem, OBJECT(s), &aw_emac_mem_ops, s,
"aw_emac", 0x1000);
sysbus_init_mmio(sbd, &s->iomem);
sysbus_init_irq(sbd, &s->irq);
}

static const TypeInfo aw_emac_info = {
.name = TYPE_AW_EMAC,
.parent = TYPE_SYS_BUS_DEVICE,
.instance_size = sizeof(AwEmacState),
.instance_init = aw_emac_init,
.class_init = aw_emac_class_init,
};

以e1000网卡为例,首先你定义的XXXState,这里是E1000State,得定义MemoryRegion类型的变量,pmio,mmio都是这个类型

1
2
3
4
5
6
7
8
9
10
11
12
13
14
15
16
17
18
19
20
21
22
23
24
25
26
27
28
29
30
31
32
33
34
35
36
37
38
39
40
41
42
43
44
45
46
47
48
49
50
51
52
53
54
55
56
57
58
typedef struct E1000State_st {
/*< private >*/
PCIDevice parent_obj;
/*< public >*/

NICState *nic;
NICConf conf;
MemoryRegion mmio;
MemoryRegion io;
......
......
} E1000State;
```

我们看看具体是怎么操作的:

首先`pci_e1000_realize`函数里面调用`e1000_mmio_setup`,里面主要调用了`memory_region_init_io`,是初始化MemoryRegion的函数,而`memory_region_add_coalescing`是初始化MemoryRegion中的`coalesced`成员(它是一个队列指针),具体看MemoryRegion的结构`https://github.com/qemu/qemu/blob/dd5b0f95490883cd8bc7d070db8de70d5c979cbc/include/exec/memory.h#L403`

假如想看更多内存相关的可以查看`https://www.anquanke.com/post/id/86412`,我这摘录一部分:

qemu中用AddressSpace用来表示CPU/设备看到的内存,一个AddressSpace下面包含多个MemoryRegion,这些MemoryRegion结构通过树连接起来,树的根是AddressSpace的root域。

也就是`AddressSpace`里面有个`MemoryRegion *root;`,而`MemoryRegion *root;`里面指向多个MemoryRegion——在`subregions`队列结构中,在`MemoryRegion`中,`RAMBlock`表示的是分配的实际内存。而MemoryRegion中的`alias_offset`和RAMBlock中的`host`都是指向“物理内存”——就是qemu进程分配的虚拟内存,虚拟机把这个作为物理内存。

```
e1000_mmio_setup(E1000State *d)
{
int i;
const uint32_t excluded_regs[] = {
E1000_MDIC, E1000_ICR, E1000_ICS, E1000_IMS,
E1000_IMC, E1000_TCTL, E1000_TDT, PNPMMIO_SIZE
};

memory_region_init_io(&d->mmio, OBJECT(d), &e1000_mmio_ops, d,
"e1000-mmio", PNPMMIO_SIZE);
memory_region_add_coalescing(&d->mmio, 0, excluded_regs[0]);
for (i = 0; excluded_regs[i] != PNPMMIO_SIZE; i++)
memory_region_add_coalescing(&d->mmio, excluded_regs[i] + 4,
excluded_regs[i+1] - excluded_regs[i] - 4);
memory_region_init_io(&d->io, OBJECT(d), &e1000_io_ops, d, "e1000-io", IOPORT_SIZE);
}

static void pci_e1000_realize(PCIDevice *pci_dev, Error **errp)
{
DeviceState *dev = DEVICE(pci_dev);
E1000State *d = E1000(pci_dev);
uint8_t *pci_conf;
uint8_t *macaddr;
......
......
e1000_mmio_setup(d);

pci_register_bar(pci_dev, 0, PCI_BASE_ADDRESS_SPACE_MEMORY, &d->mmio);

pci_register_bar(pci_dev, 1, PCI_BASE_ADDRESS_SPACE_IO, &d->io);
......
......
}

继续看看e1000_mmio_setup函数调用完,接下来调用了两个pci_register_bar,第一个是针对MEMORY 空间的(MMIO),第二个是IO空间(PMIO)。实际这个函数的操作是对&pci_dev->io_regions[region_num]的相应区域进行赋值,MMIO就是&pci_dev->io_regions[0],PMIO是&pci_dev->io_regions[1],这里的0,1并不是却别MMIO与PMIO的,只是区分是resource0还是resource1。

1
2
3
4
5
6
7
8
9
10
11
12
13
14
15
16
17
18
19
20
void pci_register_bar(PCIDevice *pci_dev, int region_num,
uint8_t type, MemoryRegion *memory)
{
PCIIORegion *r;
uint32_t addr; /* offset in pci config space */
uint64_t wmask;
pcibus_t size = memory_region_size(memory);
......
......
r = &pci_dev->io_regions[region_num];
r->addr = PCI_BAR_UNMAPPED;
r->size = size;
r->type = type;
r->memory = memory;
r->address_space = type & PCI_BASE_ADDRESS_SPACE_IO
? pci_get_bus(pci_dev)->address_space_io
: pci_get_bus(pci_dev)->address_space_mem;
......
......
}

此外MMIO与PMIO下面的不同点还有对io_regions的address_space的赋值,利用type变量进行选择,根据下面的定义,实际也是0和1,那就是0选择pci_get_bus(pci_dev)->address_space_mem,而type为1选pci_get_bus(pci_dev)->address_space_io

1
2
#define  PCI_BASE_ADDRESS_SPACE_MEMORY	0x00
#define PCI_BASE_ADDRESS_SPACE_IO 0x01

io_regions的类型是PCIIORegion,可以看到跟上面的赋值也是相对应的

1
2
3
4
5
6
7
8
typedef struct PCIIORegion {
pcibus_t addr; /* current PCI mapping address. -1 means not mapped */
#define PCI_BAR_UNMAPPED (~(pcibus_t)0)
pcibus_t size;
uint8_t type;
MemoryRegion *memory;
MemoryRegion *address_space;
} PCIIORegion;

最后问题来了,那么pci_e1000_realize在什么时候调用的呢,根据引用关系只是在e1000_class_init函数中对PCIDeviceClass->realize进行了赋值操作

1
2
3
4
5
6
7
8
9
10
11
static void e1000_class_init(ObjectClass *klass, void *data)
{
DeviceClass *dc = DEVICE_CLASS(klass);
PCIDeviceClass *k = PCI_DEVICE_CLASS(klass);
......
......

k->realize = pci_e1000_realize;
......
......
}

刚好有个题目有符号,而且也是在XXX_class_init设置realize函数指针,那就在下面实际题目中调试看看吧

总结

将 TypeInfo 注册 TypeImpl:

1、首先__attribute__((constructor))的修饰让type_init在main之前执行,type_init的参数是XXX_register_types函数指针,将函数指针传递到ModuleEntry的init函数指针,最后就是将这个ModuleEntry插入到ModuleTypeList
2、main函数中的module_call_init(MODULE_INIT_QOM);调用了MODULE_INIT_QOM类型的ModuleTypeList中的所有ModuleEntry中的init()函数,也就是第一步type_init的第一个参数XXX_register_types函数指针
3、那就下了就是XXX_register_types函数的操作了,就是创建TypeImpl的哈希表

ObjectClass的初始化:

调用链main->select_machine->object_class_get_list->object_class_foreach->object_class_foreach_tramp->type_initialize

parent->class->interfaces的一些信息添加到ti->class->interfaces列表上面,ti->interfaces[i].typename对应的type的信息也添加到ti->class->interfaces列表,最后最重要的就是调用parent的class_base_init进行初始化,最后调用自己ti->class_init进行初始化。

实例化 Instance(Object)

调用链qemu_opts_foreach->device_init_func->qdev_device_add->object_new->object_new_with_type

object_new_with_type函数里面初始化了Object的一些成员,并通过object_init_with_type函数调用ti->instance_init函数(有parent就会先递归调用object_init_with_type,再调用自身的ti->instance_init函数),而最后就是通过object_post_init_with_type函数差不多,只不过先调用自身的ti->instance_post_init,再递归调用parent的ti->instance_post_init

实际题目中的调用关系HITB-GSEC-2017-babyqemu

我们说过__attribute__((constructor))的修饰让type_init在main之前执行,通过读代码,发现是将函数写在.init_array段中的__frame_dummy_init_array_entry数组中

接下来具体看看这个是怎么实现的

以x64的qemu-system-x86_64为例,它也是一个ELF 64,也是从_start开始执行,之后调用__libc_start_main

函数原型:int __libc_start_main(int *(main) (int, char * *, char * *), int argc, char * * ubp_av, void (*init) (void), void (*fini) (void), void (*rtld_fini) (void), void (* stack_end));

__libc_start_main函数主要做了下面工作:

  • 如果EUID不等于RUID进行一些必要的安全检查(通过__libc_init_secure函数判断是否需要检查,并设置一个全局变量,需要检查则调用__libc_check_standard_fds检查,防止启动一个SUID的程序,而标准文件描述符0,1,2没有打开——据说是防止拒绝服务攻击或者黑客将不受信任的文件放在特殊的硬编码的文件描述符上。
  • 初始化线程子系统(看了下应该是ARCH_SETUP_TLS ();/* The stack guard goes into the TCB, so initialize it early. */
  • 调用_dl_setup_stack_chk_guard函数设置canary
  • 注册rtld_fini函数(__cxa_atexit ((void (*) (void *)) rtld_fini, NULL, NULL);__cxa_atexit函数的作用是Register a function to be called by exit or when a shared library is unloaded.),这个函数作用是在dynamic shared object退出或者unloaded的时候释放资源
  • 注册fini函数(__cxa_atexit ((void (*) (void *)) fini, NULL, NULL);),程序退出的时候会调用它
  • 调用初始化函数init(调用代码:(*init) (argc, argv, __environ MAIN_AUXVEC_PARAM);
  • 调用main函数(调用代码是:result = main (argc, argv, __environ MAIN_AUXVEC_PARAM);
  • 用main函数的返回值作为参数调用exit函数(调用代码:exit (result);

而上面的init函数一般是__libc_csu_init,而里面是循环调用_frame_dummy_init_array_entry[v5++])(a1, a2, v3);

1
2
3
4
5
6
7
8
9
10
11
12
13
14
15
16
void __fastcall _libc_csu_init(unsigned int a1, __int64 a2, __int64 a3)
{
__int64 v3; // r13
signed __int64 v4; // rbp
__int64 v5; // rbx

v3 = a3;
v4 = &_do_global_dtors_aux_fini_array_entry - _frame_dummy_init_array_entry;
init_proc();
if ( v4 )
{
v5 = 0LL;
do
((void (__fastcall *)(_QWORD, __int64, __int64))_frame_dummy_init_array_entry[v5++])(a1, a2, v3);
while ( v5 != v4 );
}

这个题目我们关注的是hitb相关的函数,我们看看这个数组里面有哪些函数指针,可以看到do_qemu_init_pci_hitb_register_types

1
2
3
4
5
6
7
8
9
10
11
12
13
14
.init_array:0000000000964CB0 __frame_dummy_init_array_entry dq offset frame_dummy
.init_array:0000000000964CB0 ; DATA XREF: __libc_csu_init+B↑o
.init_array:0000000000964CB0 ; Alternative name is '__init_array_start'
.init_array:0000000000964CB8 dq offset monitor_lock_init
.init_array:0000000000964CC0 dq offset do_qemu_init_register_types
.init_array:0000000000964CC8 dq offset do_qemu_init_qtest_type_init
.init_array:0000000000964CD0 dq offset do_qemu_init_memory_register_types
.init_array:0000000000964CD8 dq offset do_qemu_init_register_accel_types
.init_array:0000000000964CE0 dq offset do_qemu_init_kvm_type_init
......
......
.init_array:0000000000964D68 dq offset do_qemu_init_pci_hitb_register_types
......
......

还记得type_init就是module_init,也即do_qemu_init_ ## function(void),所以上面的函数指针为啥都是do_qemu_init_开头很清楚了吧

1
2
3
4
5
6
7
8
9
10
11
12
13
#define module_init(function, type)                                         \
static void __attribute__((constructor)) do_qemu_init_ ## function(void) \
{ \
register_dso_module_init(function, type); \
}
#else
/* This should not be used directly. Use block_init etc. instead. */
#define module_init(function, type) \
static void __attribute__((constructor)) do_qemu_init_ ## function(void) \
{ \
register_module_init(function, type); \
}
#endif

之后register_module_init这些之前都讲过了,就将后面的pci_hitb_register_types函数指针赋值给ModuleEntry中的init成员并插到了一个ModuleTypeList,而main函数会调用ModuleTypeList中的ModuleTypeList中的ModuleEntry的init函数,也即这里的pci_hitb_register_types

接下来pci_hitb_register_types会调用type_register_static,参数hitb_info_27046就是一个TypeInfo类型

__cdecl do_qemu_init_pci_hitb_register_types()
1
2
3
4
5
6
7
8
{
register_module_init((void (*)(void))pci_hitb_register_types, MODULE_INIT_QOM_0);
}

void __cdecl pci_hitb_register_types()
{
type_register_static(&hitb_info_27046);
}

里面初始化了instance_init和class_init成员,分别是hitb_instance_init和hitb_class_init(ObjectClass的初始化的时候会调用hitb_class_init,而Object初始化的时候会调用instance_init)

1
2
3
4
5
6
7
8
9
10
11
12
13
14
15
16
data.rel.ro:0000000000969020 hitb_info_27046 dq offset aHitb         ; name
.data.rel.ro:0000000000969020 ; DATA XREF: pci_hitb_register_types↑o
.data.rel.ro:0000000000969020 dq offset aVirtioPciDevic+7; parent ; "hitb" ...
.data.rel.ro:0000000000969020 dq 1BD0h ; instance_size
.data.rel.ro:0000000000969020 dq offset hitb_instance_init; instance_init
.data.rel.ro:0000000000969020 dq 0 ; instance_post_init
.data.rel.ro:0000000000969020 dq 0 ; instance_finalize
.data.rel.ro:0000000000969020 db 0 ; abstract
.data.rel.ro:0000000000969020 db 7 dup(0)
.data.rel.ro:0000000000969020 dq 0 ; class_size
.data.rel.ro:0000000000969020 dq offset hitb_class_init; class_init
.data.rel.ro:0000000000969020 dq 0 ; class_base_init
.data.rel.ro:0000000000969020 dq 0 ; class_finalize
.data.rel.ro:0000000000969020 dq 0 ; class_data
.data.rel.ro:0000000000969020 dq 0 ; interfaces
.data.rel.ro:0000000000969088 align 20h

到这里整个流程已经清楚了,但是唯一不清楚的就是hitb_class_init中的pci_hitb_realize是什么时候调用的

1
2
3
4
5
6
7
8
9
10
11
12
13
14
15
16
17
void __fastcall hitb_class_init(ObjectClass_0 *a1, void *data)
{
__int64 v2; // rax

v2 = (__int64)object_class_dynamic_cast_assert(
a1,
"pci-device",
"/mnt/hgfs/eadom/workspcae/projects/hitbctf2017/babyqemu/qemu/hw/misc/hitb.c",
469,
"hitb_class_init");
*(_BYTE *)(v2 + 236) = 0x10;
*(_WORD *)(v2 + 238) = 0xFF;
*(_QWORD *)(v2 + 192) = pci_hitb_realize;
*(_QWORD *)(v2 + 208) = pci_hitb_uninit;
*(_WORD *)(v2 + 232) = 0x1234;
*(_WORD *)(v2 + 234) = 0x2333; // device_id
}

pci_hitb_realize什么时候调用

接下来调试看看pci_hitb_realize什么时候调用,先看hitb_class_init(我能说调试比看代码方便多了么。。。,整个调用关系一目了然,害我上面看代码看了这么旧,不过其实也值得)

1
2
3
4
5
6
7
8
9
10
11
12
13
Breakpoint hitb_class_init
gdb-peda$ bt
#0 hitb_class_init (class=0x5555565ac390, data=0x0) at /mnt/hgfs/eadom/workspcae/projects/hitbctf2017/babyqemu/qemu/hw/misc/hitb.c:469
#1 0x0000555555a16b0d in type_initialize (ti=0x555556555630) at /mnt/hgfs/eadom/workspcae/projects/hitbctf2017/babyqemu/qemu/qom/object.c:817
#2 object_class_foreach_tramp (key=<optimized out>, value=0x555556555630, opaque=0x7fffffffe100) at /mnt/hgfs/eadom/workspcae/projects/hitbctf2017/babyqemu/qemu/qom/object.c:804
#3 0x00007ffff6add340 in g_hash_table_foreach () from /lib/x86_64-linux-gnu/libglib-2.0.so.0
#4 0x0000555555a16fc8 in object_class_foreach (fn=fn@entry=0x555555a159e0 <object_class_get_list_tramp>, implements_type=<optimized out>, include_abstract=<optimized out>, opaque=opaque@entry=0x7fffffffe140) at /mnt/hgfs/eadom/workspcae/projects/hitbctf2017/babyqemu/qemu/qom/object.c:826
#5 0x0000555555a17062 in object_class_get_list (implements_type=<optimized out>, include_abstract=<optimized out>) at /mnt/hgfs/eadom/workspcae/projects/hitbctf2017/babyqemu/qemu/qom/object.c:880
#6 0x000055555588987f in find_default_machine () at /mnt/hgfs/eadom/workspcae/projects/hitbctf2017/babyqemu/qemu/vl.c:1488
#7 0x0000555555755904 in select_machine () at /mnt/hgfs/eadom/workspcae/projects/hitbctf2017/babyqemu/qemu/vl.c:2745
#8 main (argc=argc@entry=0x13, argv=argv@entry=0x7fffffffe4d8, envp=<optimized out>) at /mnt/hgfs/eadom/workspcae/projects/hitbctf2017/babyqemu/qemu/vl.c:4113
#9 0x00007ffff5db6830 in __libc_start_main (main=0x555555755410 <main>, argc=0x13, argv=0x7fffffffe4d8, init=<optimizedout>, fini=<optimized out>, rtld_fini=<optimized out>, stack_end=0x7fffffffe4c8) at ../csu/libc-start.c:291
#10 0x000055555575cca9 in _start ()

接下来看pci_hitb_realize,可以看到是qdev_device_add函数里面的object_property_set_bool(OBJECT(dev), true, "realized", &err);,而且是在object_new之后,也就是说Object实例化后才调用class_init函数中设置的realize函数指针

代码:https://github.com/qemu/qemu/blob/dd5b0f95490883cd8bc7d070db8de70d5c979cbc/qdev-monitor.c#L675

1
2
3
4
5
6
7
8
9
10
11
12
13
14
Breakpoint pci_hitb_realize
gdb-peda$ bt
#0 pci_hitb_realize (pdev=0x555557f845a0, errp=0x7fffffffde60) at /mnt/hgfs/eadom/workspcae/projects/hitbctf2017/babyqemu/qemu/hw/misc/hitb.c:410
#1 0x0000555555962034 in pci_qdev_realize (qdev=0x555557f845a0, errp=<optimized out>) at /mnt/hgfs/eadom/workspcae/projects/hitbctf2017/babyqemu/qemu/hw/pci/pci.c:2002
#2 0x00005555558e5f3d in device_set_realized (obj=<optimized out>, value=<optimized out>, errp=0x7fffffffe018) at /mnt/hgfs/eadom/workspcae/projects/hitbctf2017/babyqemu/qemu/hw/core/qdev.c:907
#3 0x0000555555a15d3e in property_set_bool (obj=0x555557f845a0, v=<optimized out>, name=<optimized out>, opaque=0x555557f861f0, errp=0x7fffffffe018) at /mnt/hgfs/eadom/workspcae/projects/hitbctf2017/babyqemu/qemu/qom/object.c:1887
#4 0x0000555555a19d6f in object_property_set_qobject (obj=obj@entry=0x555557f845a0, value=value@entry=0x555557f86e10, name=name@entry=0x555555b4b98b "realized", errp=errp@entry=0x7fffffffe018) at /mnt/hgfs/eadom/workspcae/projects/hitbctf2017/babyqemu/qemu/qom/qom-qobject.c:27
#5 0x0000555555a17a60 in object_property_set_bool (obj=0x555557f845a0, value=<optimized out>, name=0x555555b4b98b "realized", errp=0x7fffffffe018) at /mnt/hgfs/eadom/workspcae/projects/hitbctf2017/babyqemu/qemu/qom/object.c:1162
#6 0x0000555555885799 in qdev_device_add (opts=0x5555565845b0, errp=0x7fffffffe0f0) at /mnt/hgfs/eadom/workspcae/projects/hitbctf2017/babyqemu/qemu/qdev-monitor.c:630
#7 0x0000555555887b37 in device_init_func (opaque=<optimized out>, opts=<optimized out>, errp=<optimized out>) at /mnt/hgfs/eadom/workspcae/projects/hitbctf2017/babyqemu/qemu/vl.c:2334
#8 0x0000555555ae09ca in qemu_opts_foreach (list=<optimized out>, func=0x555555887b10 <device_init_func>, opaque=0x0, errp=0x0) at /mnt/hgfs/eadom/workspcae/projects/hitbctf2017/babyqemu/qemu/util/qemu-option.c:1104
#9 0x0000555555756822 in main (argc=argc@entry=0x13, argv=argv@entry=0x7fffffffe4d8, envp=<optimized out>) at /mnt/hgfs/eadom/workspcae/projects/hitbctf2017/babyqemu/qemu/vl.c:4648
#10 0x00007ffff5db6830 in __libc_start_main (main=0x555555755410 <main>, argc=0x13, argv=0x7fffffffe4d8, init=<optimizedout>, fini=<optimized out>, rtld_fini=<optimized out>, stack_end=0x7fffffffe4c8) at ../csu/libc-start.c:291
#11 0x000055555575cca9 in _start ()

根据栈,我跟了下代码,还是比较复杂的,有兴趣的也可以去跟一下

总结

基础知识基本上都是搬运别人的知识,到后面源码阅读从参考别人,到自己去跟,学到很多。
其实调试会更加高效,而且没有参考文章的时候,你也可以找到一些蛛丝马迹

参考

http://blog.vmsplice.net/2011/03/qemu-internals-big-picture-overview.html
http://phrack.org/papers/vm-escape-qemu-case-study.html
https://www.giantbranch.cn/2019/12/03/CTF%20QEMU%20%E8%99%9A%E6%8B%9F%E6%9C%BA%E9%80%83%E9%80%B8%E4%B9%8BBlizzardCTF%202017%20Strng/
https://www.kernel.org/doc/Documentation/vm/pagemap.txt
https://cloud.tencent.com/developer/article/1018022
https://my.oschina.net/u/3626804/blog/1822539
http://liujunming.top/2019/07/19/%E7%A8%8B%E5%BA%8F%E5%91%98%E7%9C%BC%E4%B8%AD%E7%9A%84PCI%E8%AE%BE%E5%A4%87/
http://www.mnc.co.jp/english/INtime/faq07-2_kanren/PCIconfigurationregister.htm
https://ray-cp.github.io/archivers/qemu-pwn-basic-knowledge
https://www.w0lfzhang.com/2018/11/02/How-QEMU-Emulates-Devices/
https://blog.csdn.net/u011364612/article/details/53485856
https://www.binss.me/blog/qemu-note-of-qemu-object-model/
https://juniorprincewang.github.io/2018/07/23/qemu%E6%BA%90%E7%A0%81%E6%B7%BB%E5%8A%A0%E8%AE%BE%E5%A4%87/
https://www.cnblogs.com/etangyushan/p/6077307.html
https://developer.gnome.org/glib/stable/glib-Hash-Tables.html
https://terenceli.github.io/%E6%8A%80%E6%9C%AF/2017/01/08/qom-introduction
https://developer.gnome.org/glib/stable/glib-Singly-Linked-Lists.html
https://terenceli.github.io/%E6%8A%80%E6%9C%AF/2015/09/26/qemu-options
https://sq.163yun.com/blog/article/175668619278782464
https://www.cnblogs.com/anker/p/3462363.html
https://www.jianshu.com/p/dd425b9dc9db
https://www.anquanke.com/post/id/86412
http://www.voidcn.com/article/p-bxeqwthp-n.html
http://answerrrrrrrrr.github.io/2017/03/16/Linux%E7%A8%8B%E5%BA%8F%E5%90%AF%E5%8A%A8%E8%BF%87%E7%A8%8B/
https://refspecs.linuxbase.org/LSB_3.1.0/LSB-generic/LSB-generic/baselib---libc-start-main-.html
https://github.com/bminor/glibc/blob/653d74f12abea144219af00400ed1f1ac5dfa79f/csu/libc-start.c#L128

打赏专区